How to Set Up a Valheim Dedicated Server: Step-by-Step Guide


Valheim is a game in which players explore and survive in a world inspired by Viking mythology. A dedicated Valheim server creates a multiplayer world that stays online constantly. In a normal game, the world only works when the host is online. But with a dedicated server, the world stays active even if the host goes offline. This lets players join and play at any time without waiting for the host.
Theoretically, a Valheim dedicated server can support more than 10 players, even up to 50. However, most players suggest keeping the player count to 10 or fewer for better performance. If you are running the server on your computer, you may notice lag when more than four players join. For larger groups, it is strongly recommended to use a high-performance dedicated gaming hosting plan.
Setting up a Valheim Dedicated Server is not always easy. Many struggle with port forwarding, firewall settings, and performance issues. Some servers lag when too many players join. Others crash because of hardware limitations. Resolving these problems can take time for those unfamiliar with server configurations.
This tutorial will explain each step. You will learn how to install the server, configure settings, and optimize performance. By the end, your Valheim server will be running smoothly. Friends will be able to join without issues, and you will have full control over your multiplayer world.
#System requirements and preparation
To set up a Valheim dedicated server, you need to have compatible hardware and a stable internet connection. The server must have enough processing power to handle multiple players without lag. A fast CPU and sufficient RAM can significantly improve performance and reduce loading times. Moreover, the operating system must be 64-bit to be compatible with the dedicated server software.
#Recommended system requirements
| Component | Requirement |
|---|---|
| CPU | Minimum: 2 Cores @ 2.8 GHz Recommended: 4 Cores @ 3.5 GHz+ (More for 5+ players) |
| Memory | Minimum: 2GB Recommended: 8GB (For 3-5 players) High Performance: 16GB (For 6-10 players) |
| Storage | 5GB for game files 32GB+ for Windows OS / 25GB+ for Linux OS Extra space for backups (Varies) |
| Bandwidth | Minimum: 1-2 Mbit/s upload Recommended: 250 Mbit/s (Higher for large servers) |
| Operating System | Windows Server 2016, 2019 Linux 64-bit (eg:- Ubuntu, CentOS, Debian, openSUSE, AlmaLinux) |
A strong and stable internet connection is just as important as hardware. A wired Ethernet connection is recommended instead of Wi-Fi to minimize lag and prevent disconnections. If you want players outside your local network to connect, port forwarding is required.
To configure port forwarding, you need to access your router settings and identify the port forwarding section. Add a new rule to enable ports 2456-2458 and forward them to your server’s local IP address. This helps your external players to connect to your server without issues.
#Step 1 - Download and install SteamCMD
SteamCMD is required to install and update the Valheim Dedicated Server. It is a command-line tool that helps you to download and manage dedicated server applications for Steam games. Installing the Valheim server without SteamCMD would be more complicated and would require manual patch updates.
Next, let's take a look at how to download and install SteamCMD on your machine.
Go to your preferred web browser and search for SteamCMD. Click on the official Valve Developer Community link or go directly to SteamCMD Wiki.
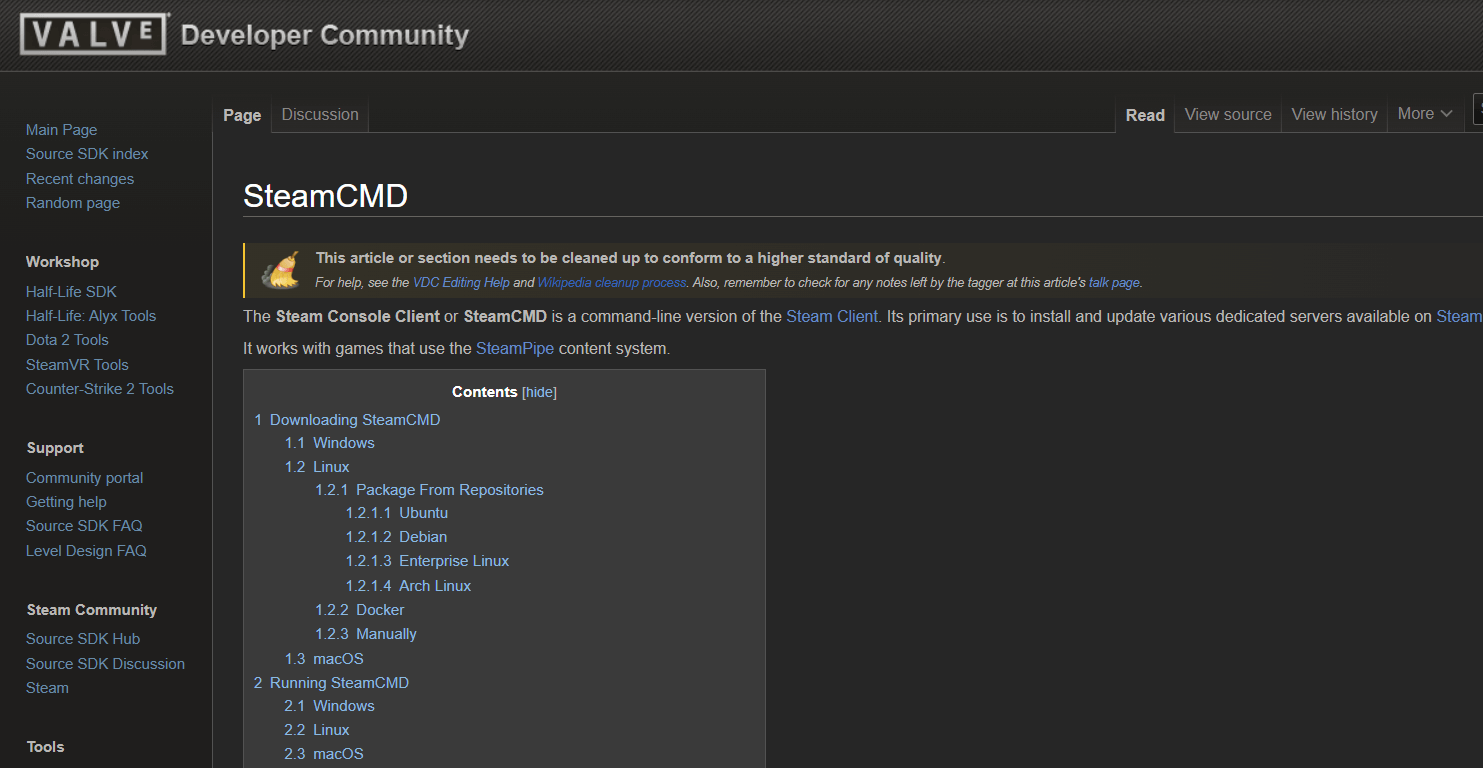
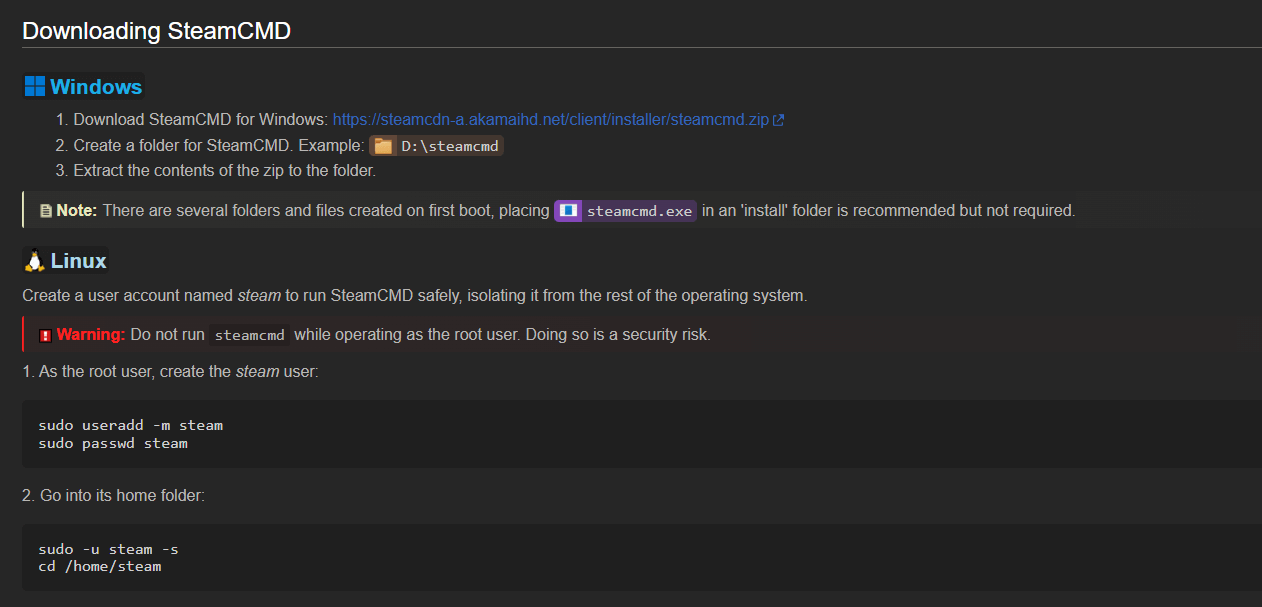
Scroll down to the “Downloading SteamCMD” section and check the Windows section.
Click the download link next to "Download SteamCMD for Windows" to start downloading the steamcmd.zip file.
Find the downloaded ZIP file and extract it to a directory of your choice. This could be a folder path like C:\steamcmd.
Inside the extracted folder, you can find the steamcmd.exe file. Right-click on it and select Run as Administrator.
This will launch a command prompt and install SteamCMD.
When the installation is complete, you will see a Steam> prompt, which indicates that SteamCMD is ready to use.
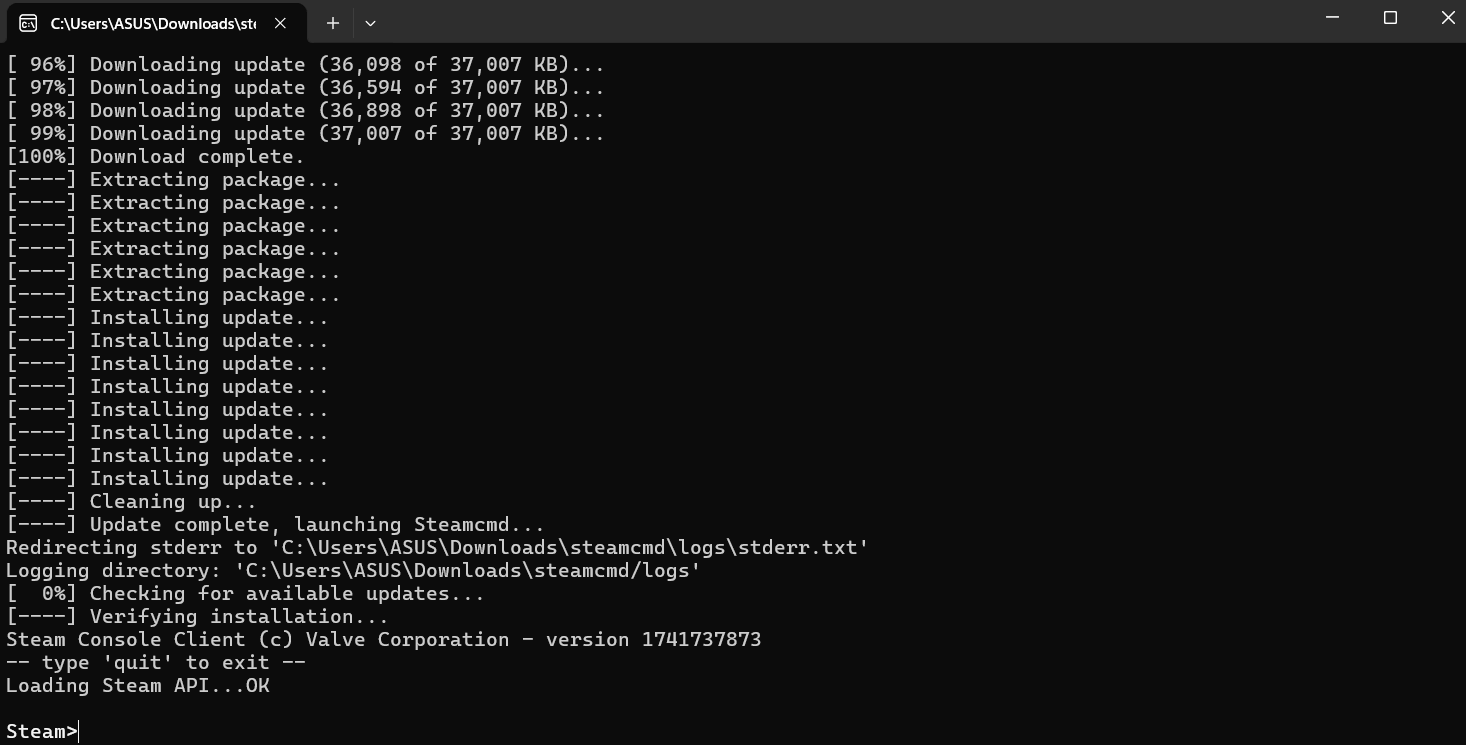
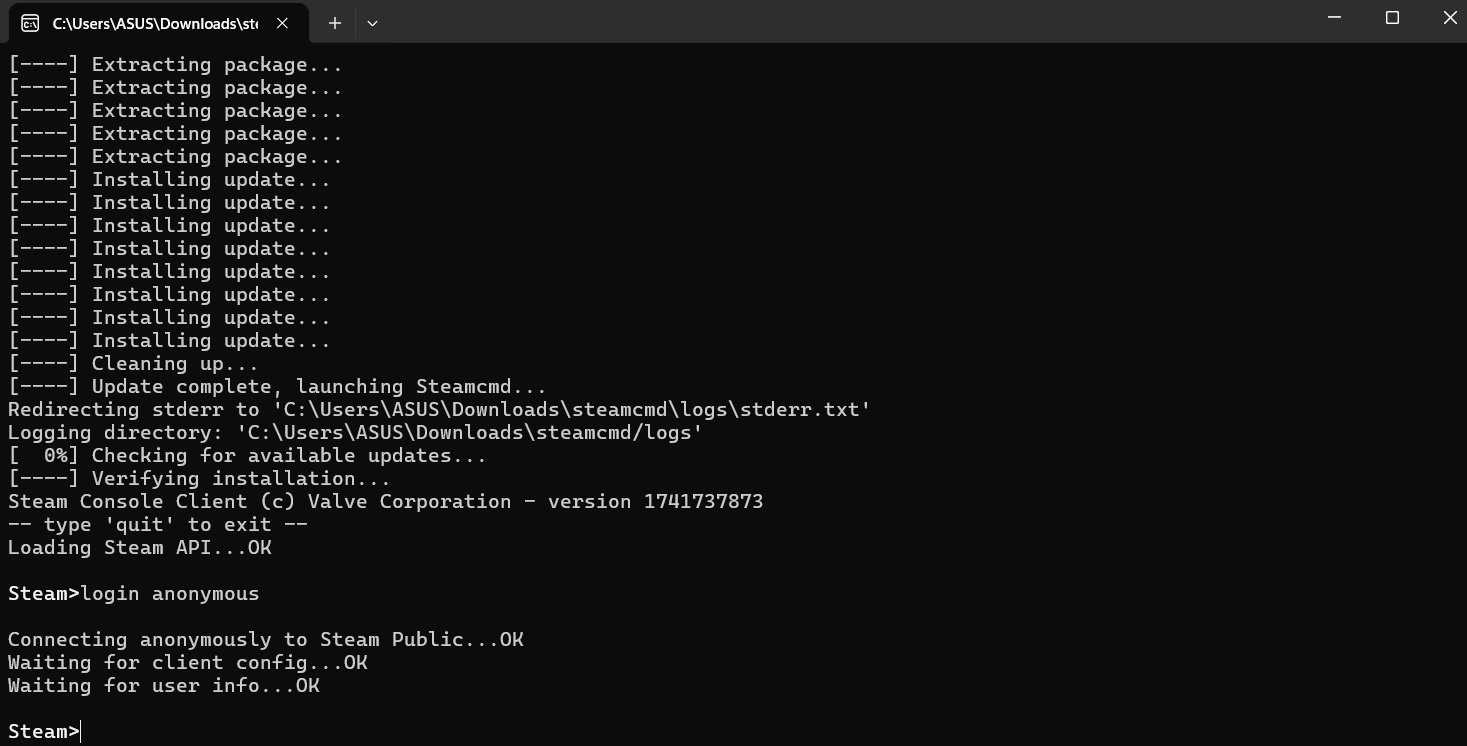
In this SteamCMD window, type the following command and press Enter to log in anonymously.
login anonymous
After running the login anonymous command, you will see the success message "Connecting anonymously to Steam Public...OK", which confirms that you are logged into SteamCMD.
#Step 2 - Installing Valheim dedicated server
To download the Valheim Dedicated Server, type the following command and press Enter
app_update <valheim-server-id>
Replace the <valheim-server-id> with the actual Valheim server app ID from Steam. 896660 is the default ID number for the Valheim server, so you can use the same.
app_update 896660
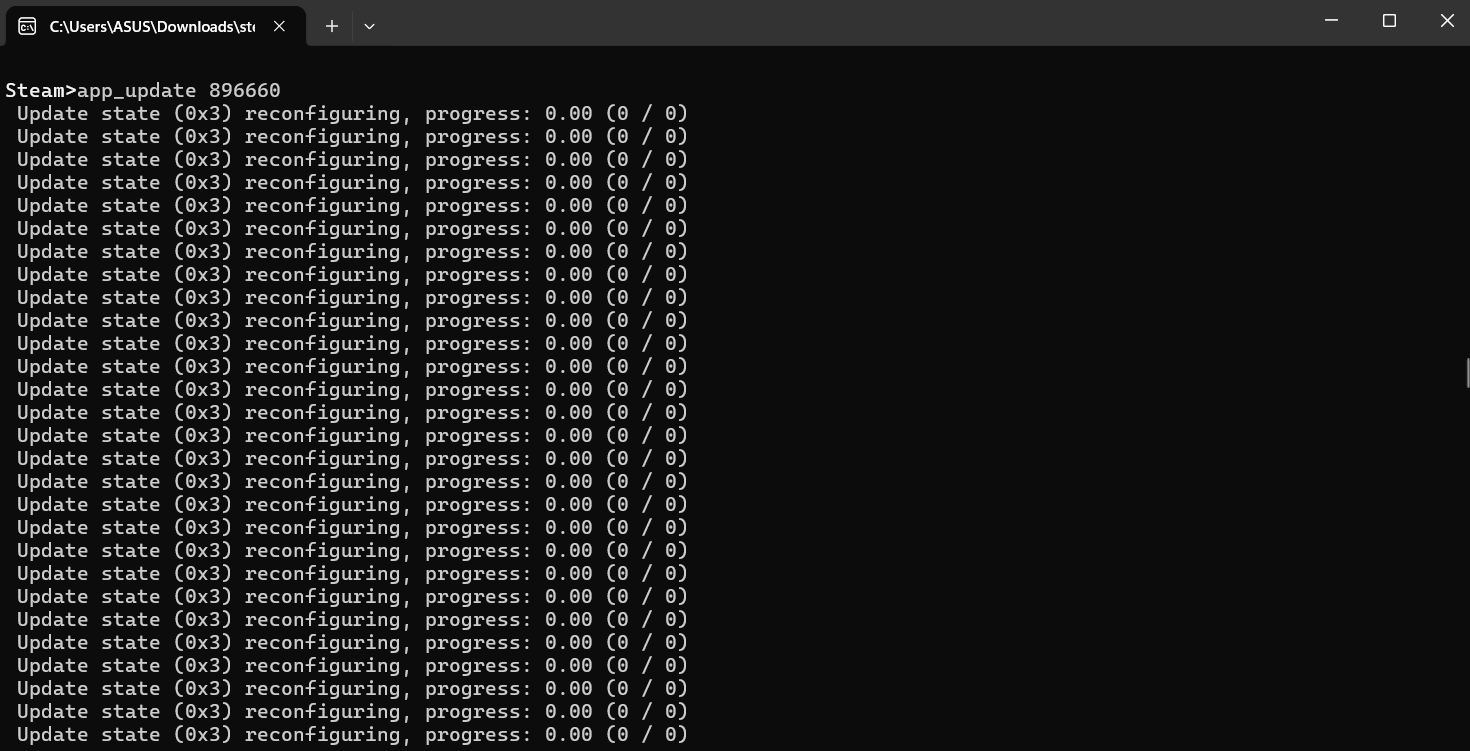
SteamCMD will now download the Valheim Dedicated Server files, and the installation process will take a few minutes.
At the end of a successful installation, you will see logs that confirm the completion of the installation. (Note: If this is your first time installing the server, SteamCMD will download all the necessary server files. In the future, you can use the same command to update the server.)

If you want to exit the steamcmd, open the server console, type "exit" and press Enter. This will safely shut down the server.
#Step 3 - Configuring server settings
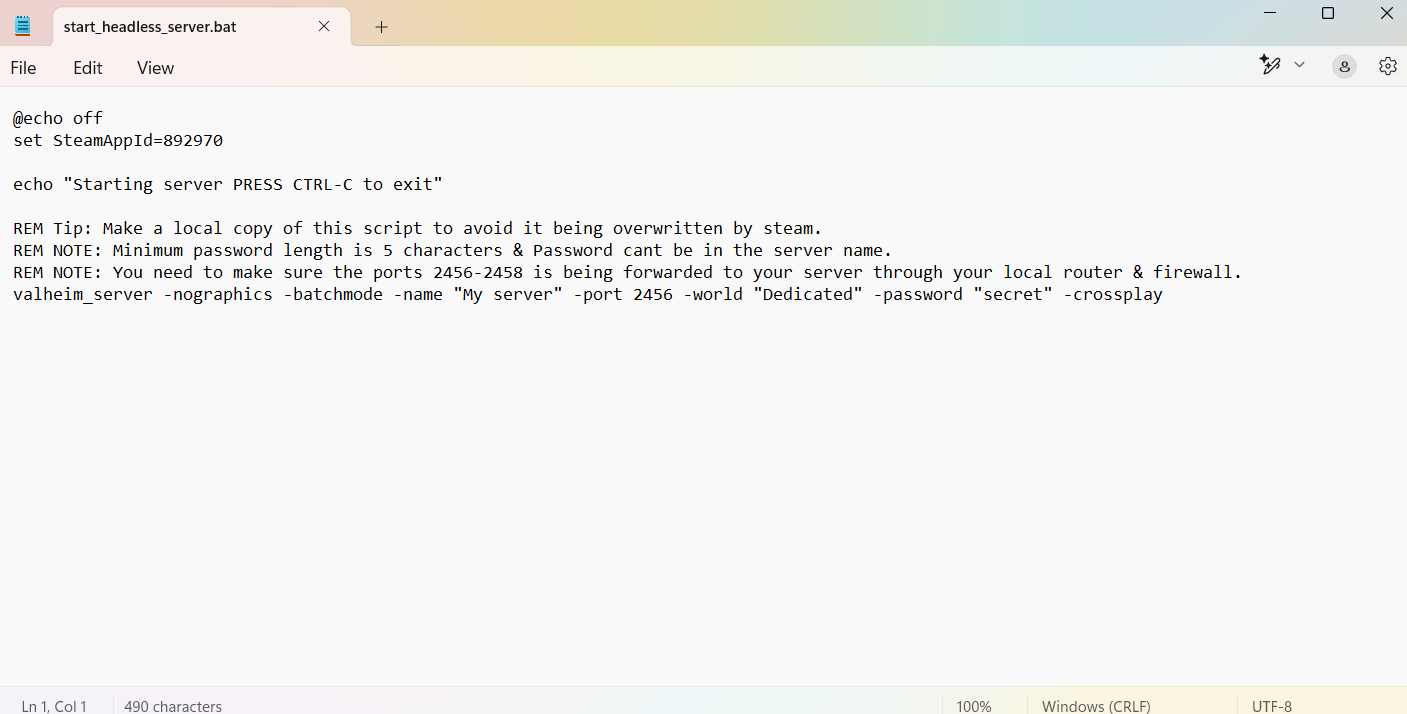
To configure the settings of your Valheim Dedicated Server, head back to the file download location and select the following path: steamApps > common > Valheim Dedicated Server
Identify the start_headless_server.bat file, right-click it, and select edit to open it using the Notepad editor. This file contains important settings that control how your server runs.
You can customize key parameters like
- Server name
- Port number
- World settings
- Password
The server name is what the players will see when they try to find your server. The port number can be updated if you don’t want to use the default port. The password must be at least five characters long. World settings define the game environment, including the world name, seed, and save file. The world name identifies the game world, the seed determines the terrain and biomes, and the save file stores player progress and builds. These settings are essential for creating a functional and accessible server.
After making the necessary updates, double-check whether all the values are correct.
Go to File and select Save to apply the new updates.
If you are interested to read more you can find the Valheim Dedicated Server Manual as a PDF file inside the Valheim Dedicated Server folder. Reading this manual will give you a better understanding of how to set up and manage your server.
#Step 4 - Configuring firewall and network settings
Before starting the server, you need to open the required ports in your Windows Firewall. Suppose you are hosting the server on a dedicated machine, such as a rented server or a VPS from a hosting provider. In that case, this is the only firewall configuration needed, and no changes to your router are required.
If you are hosting the server on your home network, using your personal PC or a local server, it may work by default if Universal Plug and Play is enabled on your router. UPnP allows the server to open the necessary ports automatically without manual configuration.
To open the necessary ports in Windows Firewall, please follow the steps below.
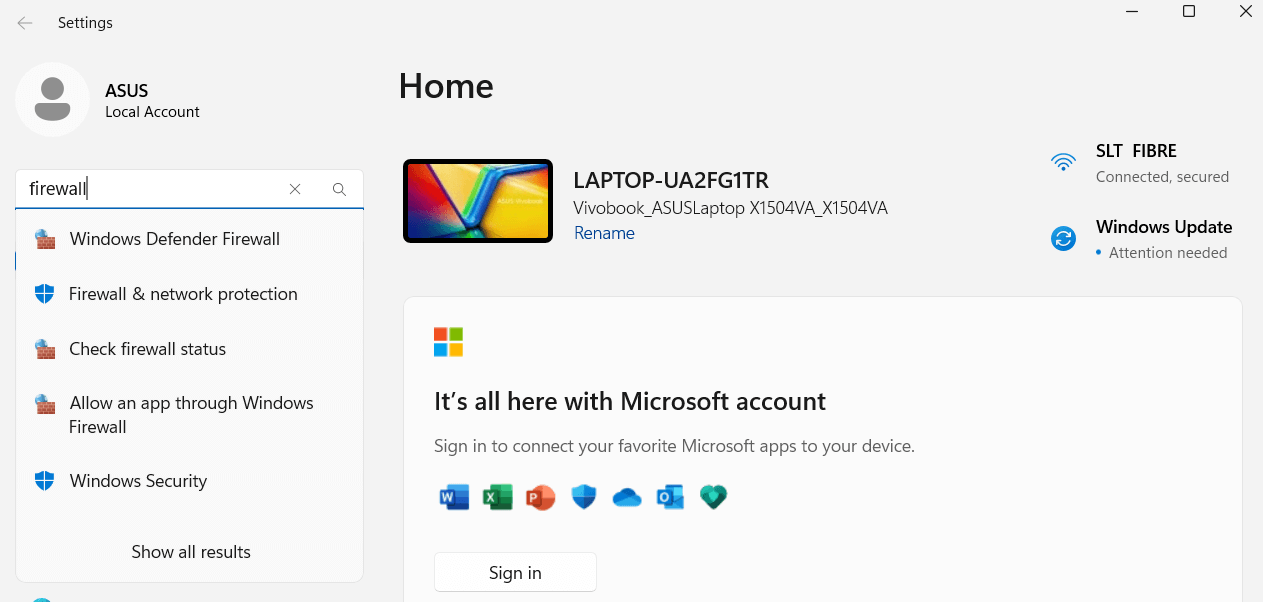
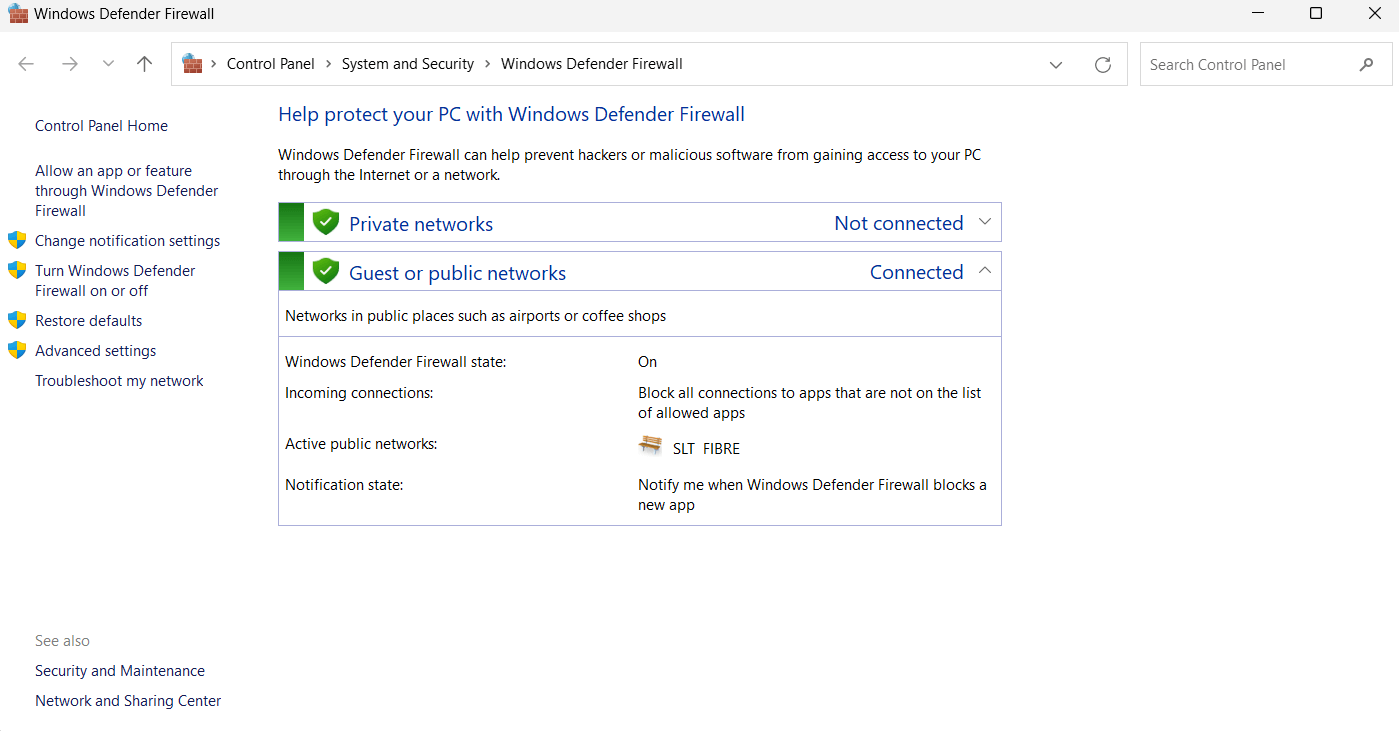
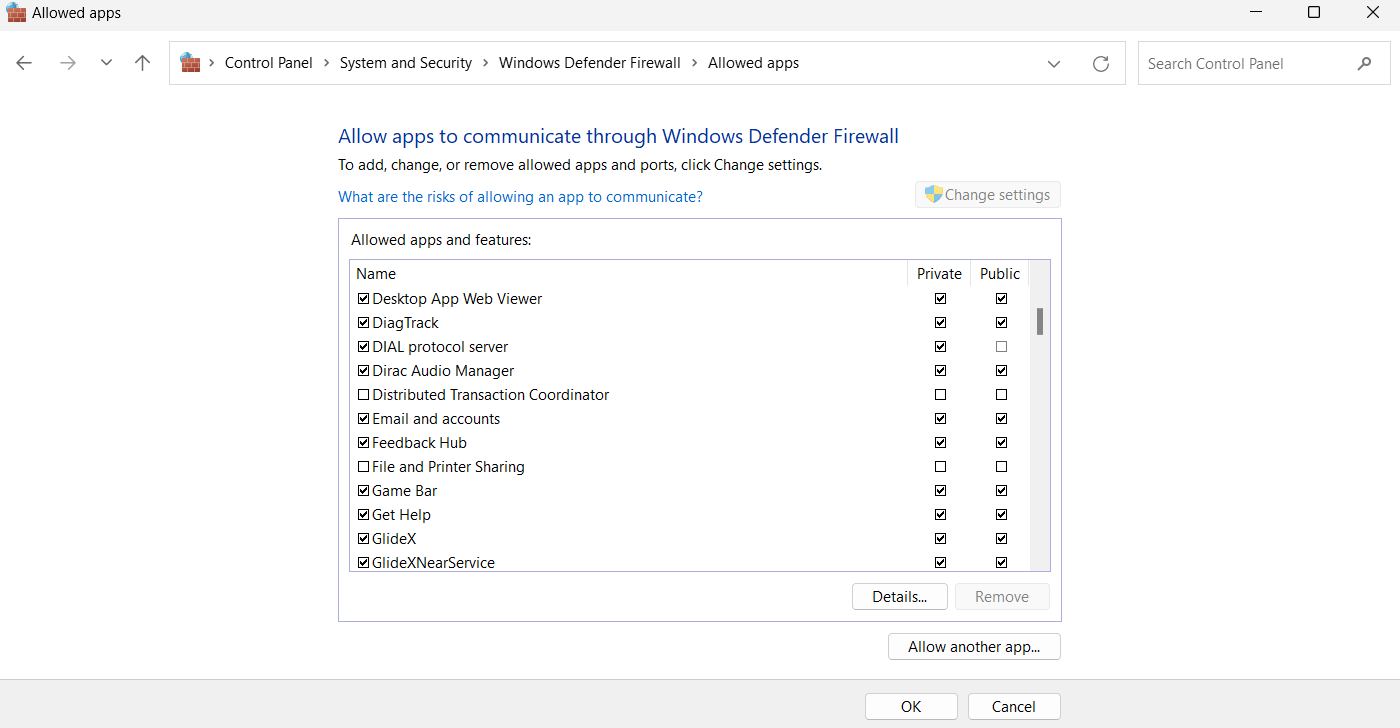
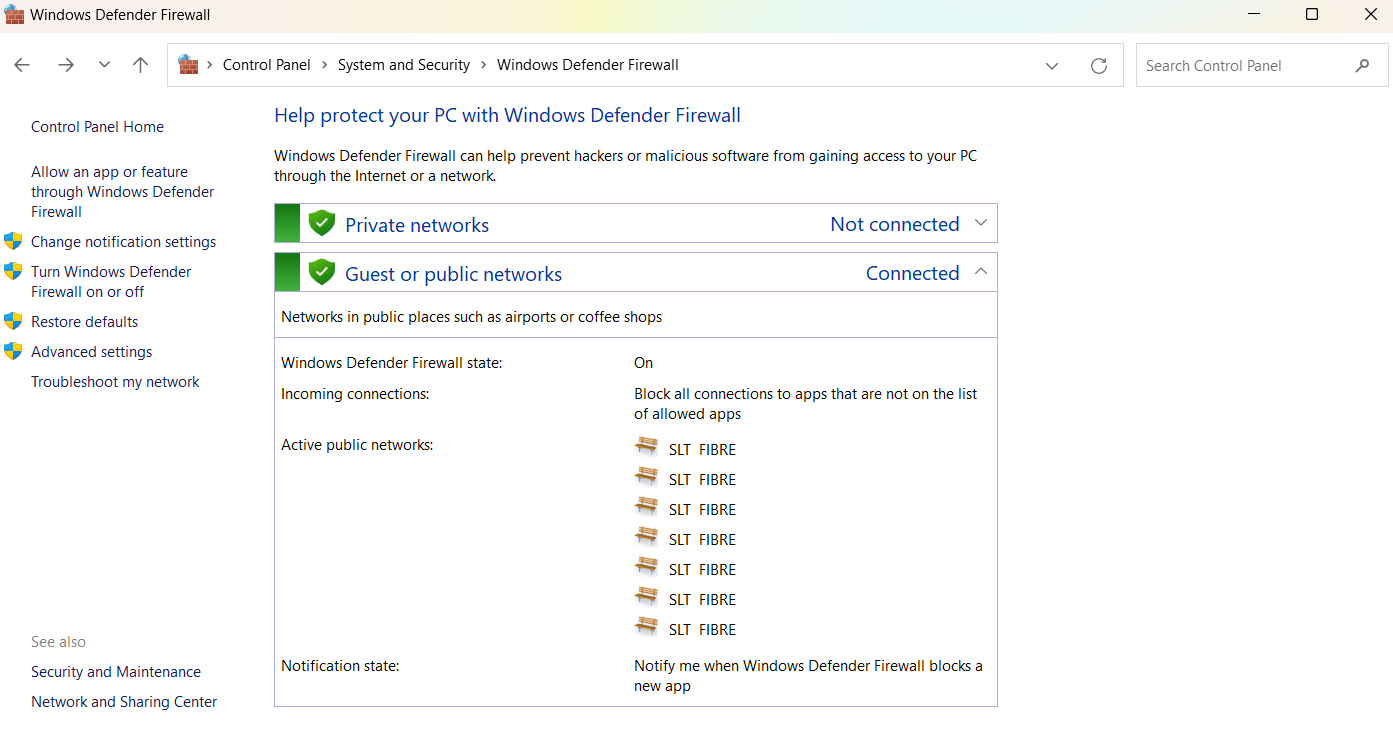
To access firewall settings in Windows, click the Start menu and type "firewall" in the search bar. Select Windows Defender Firewall from the results to open the settings.
Click on “Allow an app or feature through Windows Defender Firewall”.
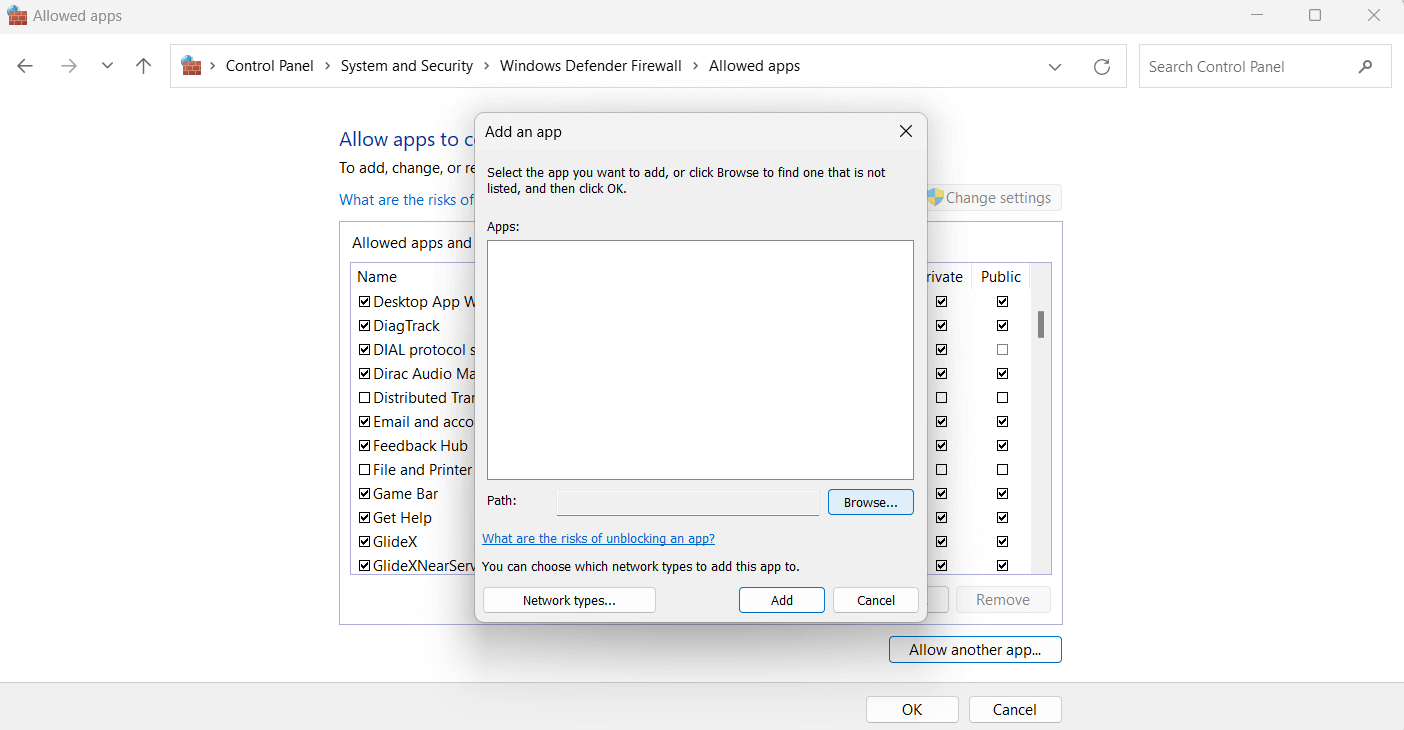
Click on “Allow another app…” to manually add a new app.
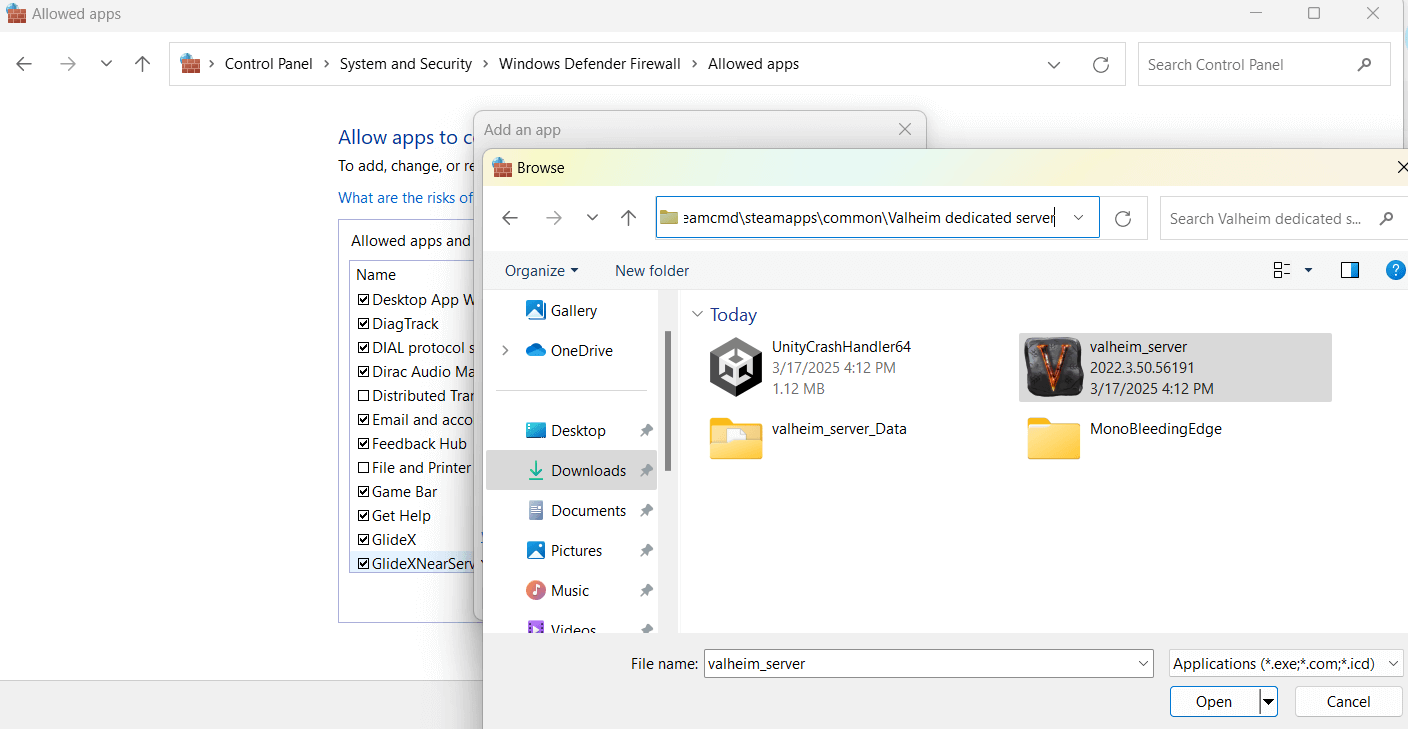
Click Browse and navigate to the Valheim Dedicated Server folder.
Select the Valheim_server.exe file and click Open.
Click “Add” to include the application in the firewall exceptions list.
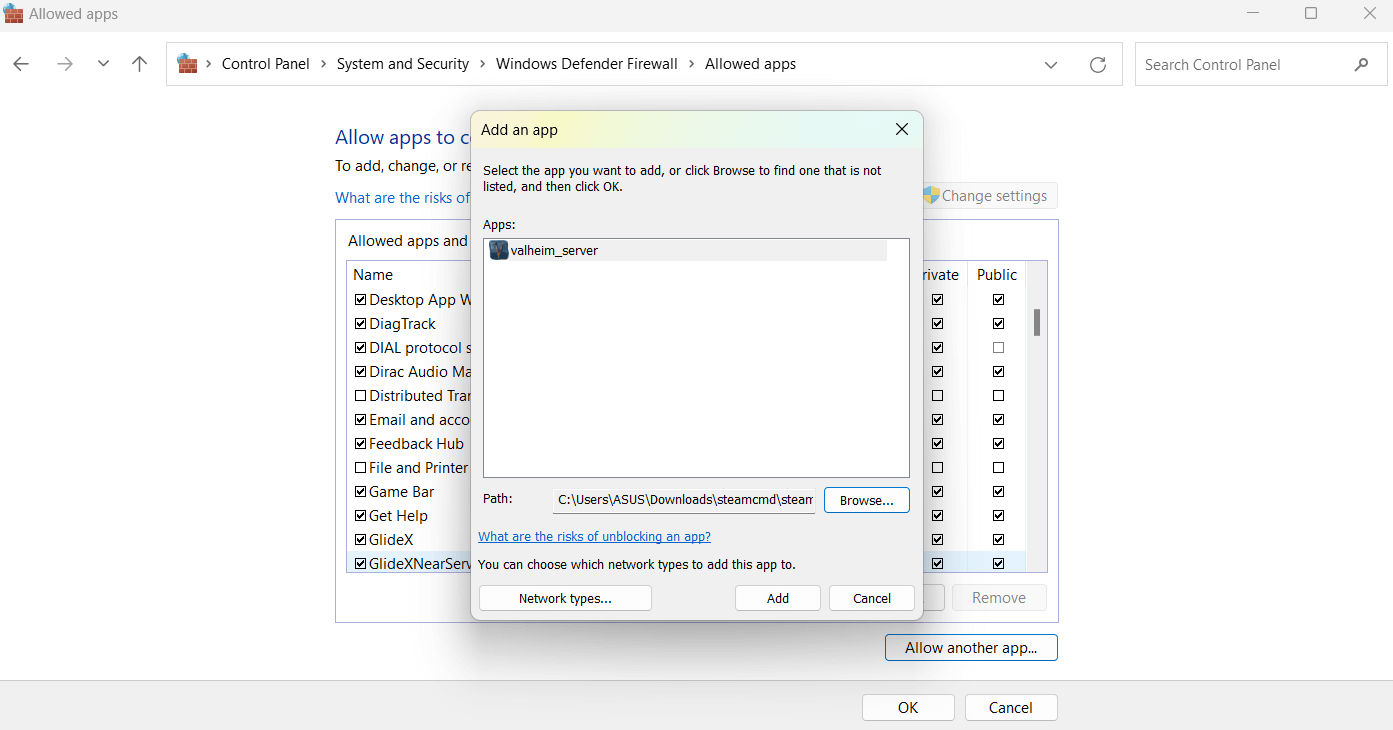
Click “OK” to save the changes.
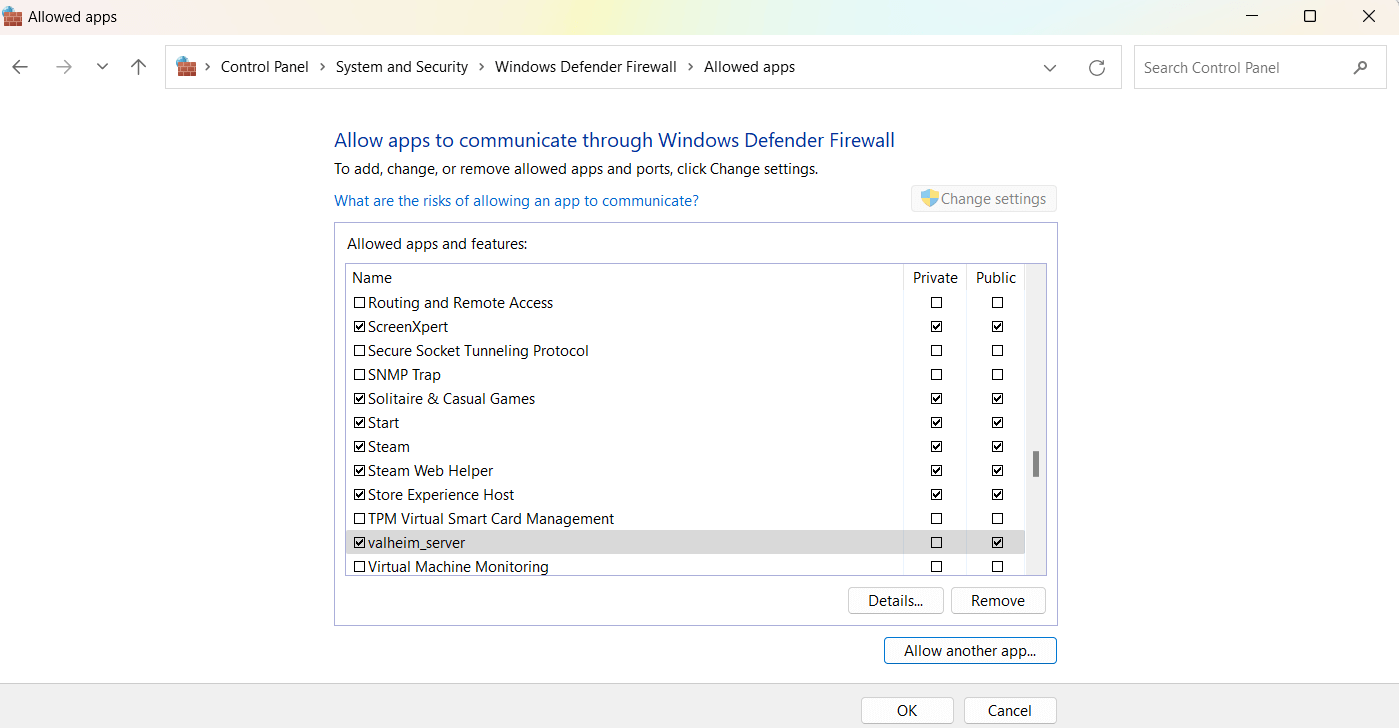
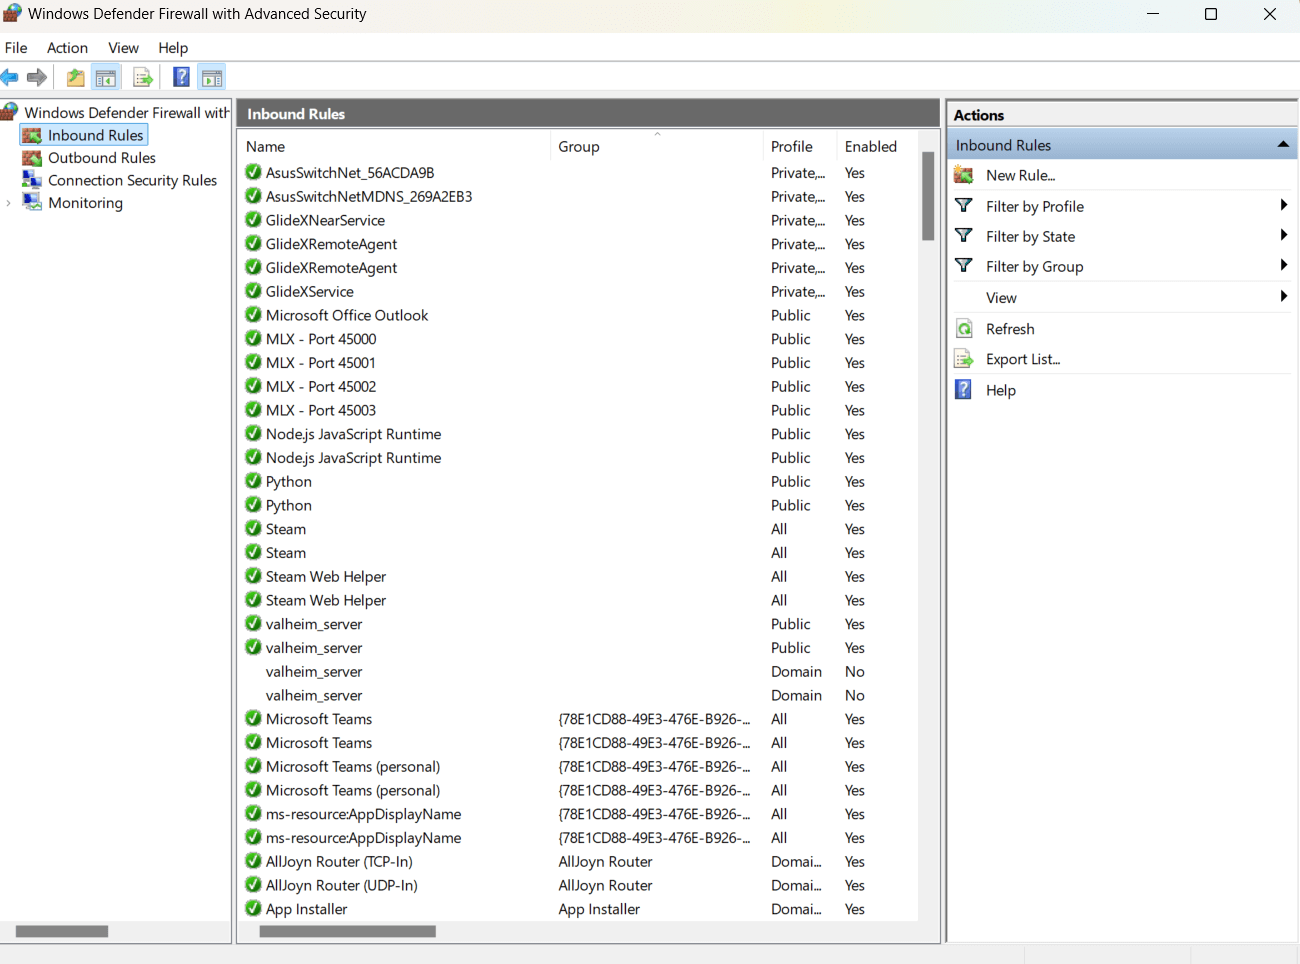
Click on “Advanced settings” in the Windows Defender Firewall panel.
Click "Inbound Rules" You should see multiple entries for valheim_server.exe. This confirms that the firewall is allowing connections for the Valheim server.
If in case this didn’t work, check with your hosting provider or IT team to see if any additional network configuration is needed.
#Step 5 - Starting the Valheim dedicated server
Navigate to the Valheim Dedicated Server directory.
Locate the file named start_headless_server.bat and double-click to run it.
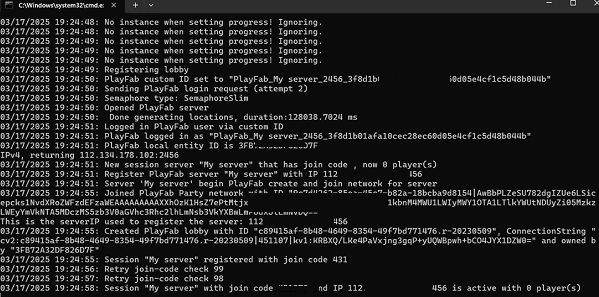
This will execute to run the Valheim server. A command prompt window will open, and you should see a log message that says, "Game server connected", which confirms that the server is running successfully.

Once the Valheim Dedicated Server runs successfully, you will see a command prompt window displaying logs confirming the server status. The key message to look for is "Session 'My server' with join code XXXXX and IP XXX.XXX.XXX.XXX:2456 is active with 0 player(s)". This means the server has started, is accessible, and is ready for players to join.
You will also see logs related to registering the server, generating locations, and PlayFab login requests. The join code and IP address are displayed, and they can be shared with friends to connect. If no errors appear and the logs indicate a successful connection, your Valheim server will be fully operational.
To safely shut down the server, press Ctrl + C in the command prompt window. This will stop the server process and close the window.
#Step 6 - Sharing server credentials with players
To make the Velheim server available for others to join, you need to share the join code and server password with them. The join code is displayed in the server log when the server starts successfully. This code helps players connect easily without the need to enter an IP address. The server password ensures that only invited players can join, thus preventing unwanted access.

In Valheim, the join code is primarily used for PlayFab servers (such as when hosting through dedicated services or Xbox crossplay) rather than direct IP connections. The standard PC version (Steam) typically requires players to manually enter the server IP address to join.
Users intending to join a game should follow the steps outlined below:
-
Install the Valheim game via Steam and launch it.
-
Navigate to the main menu and select 'Join Game'
-
Then click the 'Join IP' button
-
Provide the IP address followed by the port (e.g., 198.56.10.89:2456)
-
Provide server password when prompted
If your server is PlayFab-enabled, players will see a Join Code field when selecting a server under the Join Game menu. Otherwise, they must manually enter the IP address in the "Join IP" section.
To join the Game, select “Start Game”.

Click on “Join Game”.

Enter the server name in the search bar and look for it in the results. Select the correct server from the list. Click the "Connect" button to join.
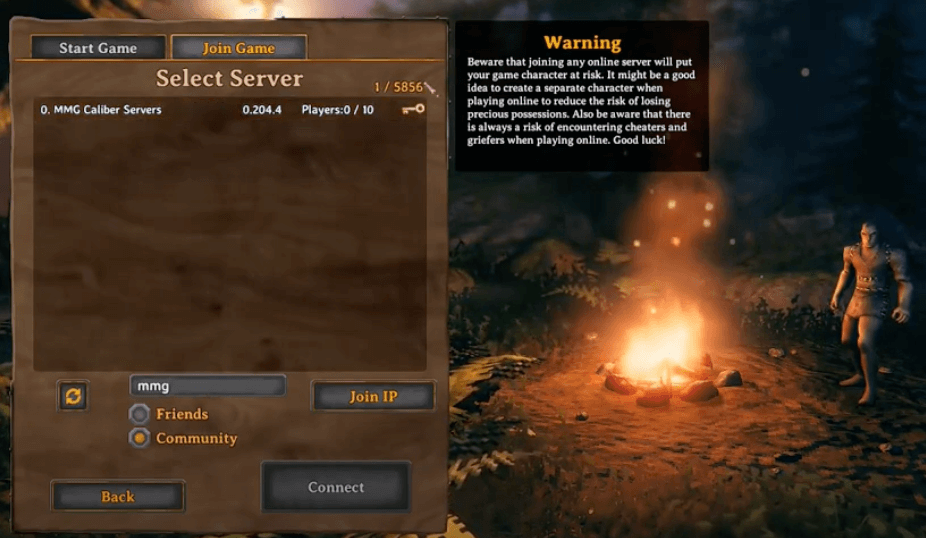
You will be prompted to enter the server password. Type the correct password and proceed.

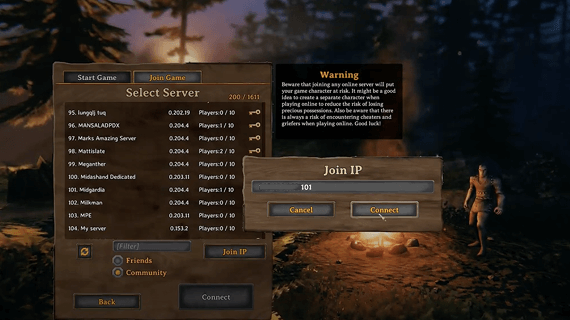
Players can manually enter the server IP and port. For that, click on “Join IP” and enter the IP address in the input field, and click “Connect”. (Note: The IP address is displayed in the server logs and usually follows the format XXX.XXX.XXX.XXX:2456.)
When players try to connect, they will be prompted to enter the server password. They must type the correct password to join. If they enter the wrong password, they will not be able to connect. Make sure everyone has the correct details to avoid issues. If someone cannot join, double-check the credentials and confirm that the server is running properly.
#Server administration and management
Next, let’s look at how to manage your Valheim dedicated server. It’s actually pretty simple. There are three important files you need to know about: adminlist.txt, bannedlist.txt, and permittedlist.txt. These files control who can access your server.
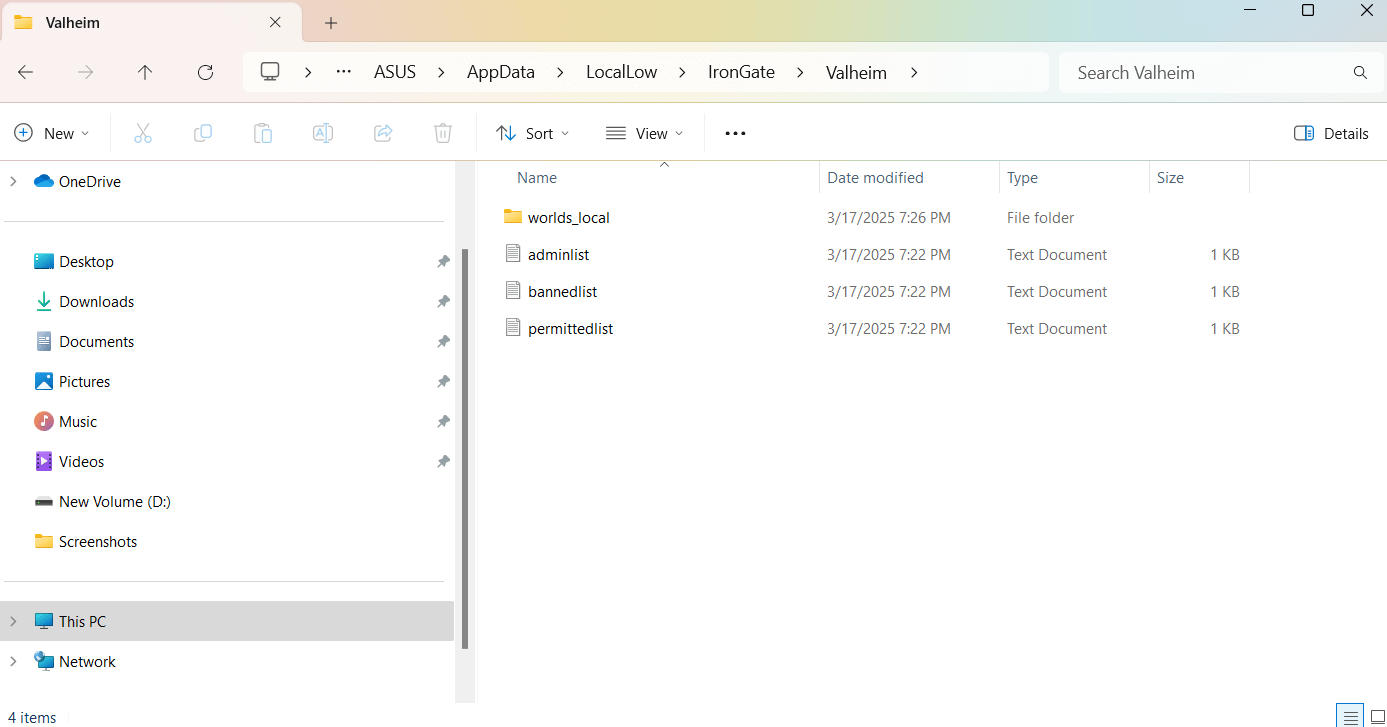
The adminlist.txt file gives admin privileges, which means certain players can manage the server. The bannedlist.txt file is exactly what it sounds like. It lists players who are not allowed to join. Then there’s the permittedlist.txt file, which only allows listed players to join while blocking everyone else. You can find all these files in your Valheim save folder located at C:\Users\YourUsername\AppData\LocalLow\IronGate\Valheim.
(Note: If you don’t see the "AppData" folder, enable hidden files in Windows by going to View > Show > Hidden items in File Explorer.)
Now, if you want to manage your server while playing, just press F5 to open the admin console. From here, you can use commands to control who stays and who gets kicked. You can use the following commands.
- kick PLAYERNAME to remove a player.
- ban PLAYERNAME to block someone from joining.
- unban PLAYERNAME to remove a player from the ban list.
- banned to see all banned players.
To keep your server running smoothly, make sure you back up your world files regularly so you don’t lose progress. Also, check your server performance, especially RAM and network stability, to prevent lag. And don’t forget to update your server using SteamCMD to fix bugs and stay compatible with the latest version of the game.
#Performance optimization and maintenance
A fast Valheim Dedicated Server needs enough RAM to support players and world activities without lag. If your server has low memory, it may become slow or crash when more players join. At least 8GB of RAM is recommended. For big worlds, 16GB or more is better. If you still have problems, try limiting the number of players or upgrading the server hardware for better results.
Turn on automatic world saves to protect game progress in case of crashes. Set the save time to save the world often, but not too often, to avoid slowing down the server. Also, delete abandoned buildings, unused items, and extra changes to the terrain. This helps the server run better and makes the world load faster.
Watching server performance is important to stop problems before they happen. Use monitoring tools to check CPU and RAM usage, internet speed, and the number of players. Restarting the server often helps remove memory leaks and stop lag. Keep your server updated with SteamCMD to match the latest Valheim version and get better game performance.
#Conclusion
Valheim dedicated server is what you need if you want a persistent game world without relying on a host player to stay online. While you can set up a Valheim dedicated server on your PC, the better option for serious gameplay is to use a third-party hosting service.
Cherry Servers is a highly reputable gaming hosting provider. They offer both bare metal cloud services and virtual servers. Its pricing plans cover all needs, from small setups to high-performance servers. You can choose AMD or Intel CPUs, add as much RAM as needed, and get all of this at very fair prices.
By using a high-performance third-party hosting service, you can support more players without lag and manage large game worlds. This is a strong choice for players who want smooth, always-online Valheim gameplay.